Deploying Your Blog
![]() Have a challenge with any of this? Let us know and we’ll help!
Have a challenge with any of this? Let us know and we’ll help!
This can get a little tricky so we’ll walk through this example with Namecheap and provide some screenshots.
- Add a file to the root of the repository called
CNAME. The contents of the file should be the domain name or subdomain you’re deploying to, e.g.blog.mysite.comorbloginaboxdemo.com. - Save the file, commit it, and merge the change.
- (are these terms completely unfamiliar? That’s ok! Feel free to create an issue in this repository and we’ll help you walk through it.)
Next up, it’s time to Get the GitHub Pages settings in place.
- In your repository on GitHub, navigate to the
Settingstab and click it. - On the left-hand navigation, choose
Pagesfor pages settings. - From the
Sourcedrop-down, select themainbranch. You can think of this branch like “production”. Anything merged into it will get published (unless it’s a future post). - Change the
Folderoption from/(root)to/docsand clickSave. - Note: we’re not going to choose a theme, because we’re already using a theme that comes bundled with our blog.
With those settings in place, next we need to go to our domain registrar or the organization who handles DNS (in our example, we’re using Namecheap, because Sean loves them.) We’re going to follow the GitHub Pages custom domain instructions here. The instructions below work if you’re using an “apex” or “naked” domain, such as our bloginaboxdemo.com site. If you’re using a sub-domain, follow the instructions at the above link. Create an issue if you get stuck, and we’ll help you.
- Log into Namecheap and go to the domain’s settings.
- Click the “Advanced DNS” button” to go to DNS settings
- If it’s a new domain, remove any default DNS records that are there. Otherwise, be careful what you change (and feel free to ask us for help by creating an issue).
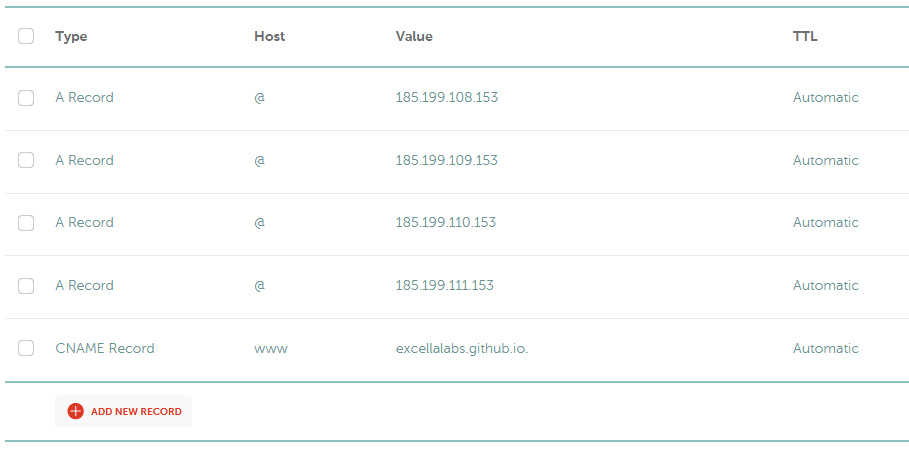
- For each of the IP Addresses in the Apex domain instructions (at the time,
185.199.108.153,185.199.109.153,185.199.110.153,185.199.111.153):- Create a new record, of type
A. - Make the host
@(which is short-hand for the “naked domain”, oryoursite.com). - Make the value the IP address
- Repeat for all IP addresses
- Create a new record, of type
- Click to save your changes.
- Next you’ll likely want to create a
wwwsubdomain so thatwww.yoursite.comandyoursite.comgo to the same place.- Create a new DNS record, of type
CNAME. Set the host aswww, and the value asyourusername.github.io. For example, this repo is hosted on theexcellalabsorg, so our value would beexcellalabs.github.io.
- Create a new DNS record, of type
Here’s an example of how the DNS records might look:
At this point, your DNS changes should be live soon (they take some time to propagate – sometimes more than 24 hours). Then, your blog should be available at the URL you configured.
Now we can enforce HTTPS, which is important for the security of the web.
- Go back to the GitHub Pages settings
- Check the
Enforce HTTPSoption. You’ll see a green checkmark after it automatically saves.
Comments